There are reasons why you would, however, choose a USB device over a DVD disc, and bootable software is definitely one of them.
Not only is it faster to copy data such as setup files from a USB drive, but during usage the access times are also significantly faster. Therefore, installing something like Windows 7 will work that much faster from a USB drive than from a DVD (and of course, is particularly useful for the PCs without an optical drive; this isn’t something we should just leave for the pirates to enjoy, Emil Protalinski of ars technica commented.
This guide will show you two different ways to create a USB flash drive that works just like a Windows 7 DVD. In order to follow this guide, you’ll need a USB flash drive with at least 4GB of free space and a copy of the Windows 7 installation disc.
Windows 7 USB DVD Download Tool
You are normally given this tool when you purchase from the online Microsoft Store.

The easiest way to turn a USB flash drive into a bootable Windows 7 installer is by using the tool Microsoft offers, cunningly named the Windows 7 USB/DVD Download Tool. To get started, download the installer [exe] from Microsoft.com and follow the basic steps to put it onto your computer; you can put it on the computer you plan to install Windows 7 on or another one, it doesn’t matter.

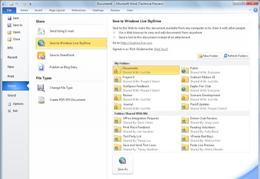
Once it is installed, it should create an icon on your desktop, so double-click that to open. If you can’t find it, use the search function in the Start Menu with a keyword like “USB.” Launching it should give you the above screen, and step one is to find the Windows 7 .ISO file. The tool only accepts .ISO images, so we recommend that you convert yours if it’s in a different DVD image format.

Step two is straightforward: simply choose USB device.

In step three, all you have to do is make sure that you are choosing the correct USB device. If you have other data on the device, move it to your hard drive, another USB device, or somewhere else before proceeding.

The tool will prompt you if it detects data on the device. Once your data is backed up elsewhere, click Erase USB Device. You will get another prompt warning you that all the data will be wiped. Click yes to continue.

The format will be very quick, while the copying of the files will take a little bit more time (about 10 to 15 minutes).

Once the process is complete, you should get the above confirmation message. At this point you can close the tool and use the USB drive to install Windows 7. Remember that you’ll have to choose to boot off the USB drive. Before doing so, you may also want to open up the USB drive and double click on setup.exe to see if everything looks okay.