You have seen the results all over social media. A still photograph suddenly shifts into motion – clouds drift across a landscape, a portrait subject blinks and smiles, a product shot rotates as if on a turntable. It looks like professional video production, but the source material is a single image. And the entire process takes minutes.
If you have been wondering how to do this yourself – whether for social content, marketing materials, personal projects, or just to experiment – this guide walks you through the full workflow. No prior video editing experience required. No expensive software. Just a photo, an AI tool, and a few simple decisions.
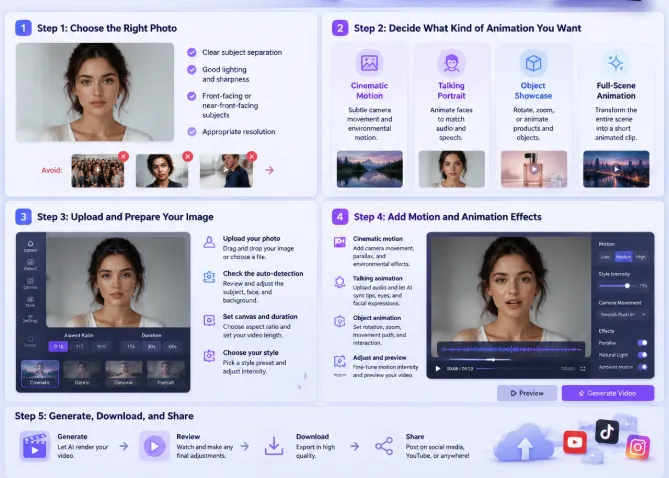
Step 1: Choose the Right Photo
The quality of your output starts with the quality of your input. Not every photo animates equally well, and a few minutes spent selecting the right image will save you frustration later.
What makes a good photo for AI animation:
- Clear subject separation: Photos where the main subject is distinct from the background produce the best results. The AI needs to identify what should move and what should stay still. A person against a simple backdrop works better than a crowd at a festival.
- Good lighting and sharpness: AI tools work with the data in your image. A well-lit, in-focus photo gives the algorithm more to work with. Grainy, dark, or blurry images produce weaker animations.
- Front-facing or near-front-facing subjects: For portraits and talking-head animations, the more of the face the AI can see, the more natural the result. Profile shots and extreme angles reduce the available facial data and can produce distorted animations.
- Appropriate resolution: Most AI tools handle standard smartphone photo resolutions without issues. Extremely low-resolution images (under 500 pixels on the longest edge) may produce pixelated output. There is no need to upscale, but avoid tiny thumbnails.
Photos to avoid: group shots with many faces (the AI may animate the wrong subject), heavily filtered or over-edited images (the unnatural smoothing confuses face detection), and images where the subject is partially cut off at the edges.
A practical tip: if you are new to this, start with a simple portrait – head and shoulders, looking at the camera, clean background. It is the most forgiving input and gives you a clear baseline for what the technology can do.
Step 2: Decide What Kind of Animation You Want
Before you touch any tools, decide on the type of output. AI photo-to-video tools generally support a few distinct modes, and picking the right one shapes everything that follows.
Cinematic motion: The photo gains subtle three-dimensional depth. The camera appears to track slightly, creating parallax between foreground and background. Clouds move, water ripples, leaves sway. Best for landscapes, cityscapes, and atmospheric shots.
Talking portrait: The subject’s face animates to match an audio track. Mouth movements sync with speech, eyes blink naturally, head tilts and nods align with vocal inflection. Best for narrated content, personal messages, educational clips, and social media storytelling.
Object showcase: A product or object rotates, zooms, or demonstrates motion within a defined frame. Best for e-commerce, product marketing, and any scenario where you need to show an item from multiple angles or in use.
Full-scene animation: The entire image transforms – foreground and background both move, elements appear or transition, and the result resembles a short film clip rather than an animated photograph. Best for creative and artistic projects where realism is not the primary goal.
Your choice here determines which tool features you will use and how you prepare your assets. A talking portrait needs an audio track. Cinematic motion works with the photo alone. Knowing your destination before you start prevents wasted time.
Step 3: Upload and Prepare Your Image
Now you actually open the tool. The exact interface varies by platform, but the core workflow is consistent across most AI video tools.
- Upload your photo. Drag and drop or use the file picker. The tool will process the image – usually within seconds – and present you with a preview.
- Check the auto-detection. Most tools automatically identify faces, subjects, and background regions. Review what the AI has detected. If it misidentified the subject or included unwanted elements, most platforms let you adjust the selection with a simple brush or bounding box tool.
- Set your canvas and duration. Choose your aspect ratio based on where the video will live. Vertical (9:16) for TikTok, Reels, and Shorts. Square (1:1) for Instagram feed posts. Horizontal (16:9) for YouTube. Then set your target duration – 15 to 30 seconds is the sweet spot for most social platforms.
- Choose your animation style. Most tools offer style presets – “cinematic,” “gentle,” “dynamic,” “portrait,” etc. These control the intensity and character of the motion. Start conservative; you can always increase intensity, but over-animated faces quickly enter uncanny valley territory.
Step 4: Add Motion and Animation Effects
This is where the photo comes to life. Depending on your chosen tool and animation type, you will have different controls.
For cinematic motion: Adjust the motion depth and direction. Deeper depth creates more dramatic parallax between foreground and background. You can usually set the camera movement path – slow zoom in, gentle pan left, subtle dolly. The default settings on most platforms produce pleasant results; tweak only if the preview looks unnatural.
For talking portraits: Upload or record your audio track, then let the AI handle the synchronization. The technology that powers this step is AI lip sync, and it is what transforms a silent photograph into a speaking character. The system analyzes the audio waveform, maps phonemes to mouth shapes, and generates frame-by-frame facial animation that matches the speech. The best implementations handle this so smoothly that viewers focus on the message rather than the mechanics.
Many users start with a lip sync ai online free no sign up tool to test the waters – upload a portrait and an audio clip, get back a talking video, no account required. This kind of instant, friction-free access is ideal when you are learning the workflow and want to see results before committing to a longer session.
For object showcase: Set the rotation axis, zoom range, and any background animation. Some tools let you define a “hero angle” where the motion slows or pauses to highlight a specific feature. If you are showcasing a product, make sure the most important details – brand name, key features, materials – are visible during the slowest part of the motion path.
Step 5: Generate and Review Your Video
Hit generate and give the AI a moment to work. Processing time depends on video length, resolution, and the complexity of the animation, but most short clips complete within one to three minutes.
When the output arrives, review it with fresh eyes. Check for:
- Natural motion: Does anything move in a way that feels wrong or jarring? Pay special attention to hands, hair edges, and areas where the subject meets the background.
- Lip sync accuracy: For talking portraits, watch the mouth closely at normal speed. Small timing discrepancies are common and often invisible to casual viewers, but obvious mismatches need a retry – usually with a cleaner audio track or a photo with better facial visibility.
- Composition: Did the animation crop or reframe in a way that cuts off important elements? Most tools let you adjust the framing before generating, but sometimes you only notice issues in the final output.
- Duration and pacing: Does the video feel too long or too short for its content? A 15-second clip that drags can be trimmed. A video that rushes through its best moments might need a slower animation speed.
Most platforms let you regenerate with adjusted settings at no extra cost. Use that freedom. Your first generation is rarely your best.
Step 6: Optimize and Enhance the Final Result
Raw AI output is often 90 percent of the way there. A few finishing touches can close the remaining gap.
Color grading: If your tool offers filters or color adjustments, subtle warmth or contrast tweaks can make the video feel more polished. Avoid heavy filters – they clash with the natural look that makes AI animation impressive.
Audio levels: For talking portraits, make sure the audio is clear and appropriately loud. Background music, if added, should sit well below the speech level. Nothing undermines a good video faster than audio that is hard to hear.
Captions and text overlays: On social platforms, most videos are watched without sound initially. Adding captions to talking-head videos dramatically increases completion rates. If your AI tool does not include auto-captioning, you can add captions in any basic video editor afterward.
Trim the edges: Remove the first second and last second if they contain any startup artifacts or fade effects that feel mechanical. Clean in-and-out points make the video feel more intentional.
Step 7: Export and Publish
Export your video at the highest available resolution. Most AI tools offer 1080p output, which is sufficient for all social platforms and most web use. If 4K is available and your storage and bandwidth can handle it, opt for the higher resolution – it gives you more flexibility for cropping and zooming in post.
File format defaults to MP4, which is universally compatible. No need to convert.
Before publishing, watch your video on a phone screen – not just on your desktop monitor. The smaller screen reveals issues that are invisible at full size: text that is too small to read, motion that feels too subtle, details that get lost. If it works on mobile, it works everywhere.
Tips for Better Results
Use high-quality audio: The best lip sync animation in the world cannot save a recording that sounds like it came through a walkie-talkie. Record in a quiet space, speak clearly, and if you are using a phone, position the microphone reasonably close to the source.
Batch your workflow: Once you understand the process, do not create one video at a time. Gather five photos, write or record audio for each, and process them in a single session. The time savings compound when you move through the steps in batches.
Experiment across tools: Different AI platforms excel at different things. One might produce better cinematic motion, while another handles talking portraits more naturally. For projects that need extensive photo-to-video conversion, an image to video ai free unlimited platform removes usage caps from the equation, letting you iterate freely across dozens of photos to find what works best for your specific content style.
Save your best settings: When you hit a combination of animation style, duration, and effects that produces exactly the look you want, save it as a preset if your tool supports it. Consistency across videos builds a recognizable visual brand, and presets make consistency effortless.
Start simple and iterate: The most common mistake beginners make is trying to create something too ambitious on the first attempt. Start with a basic portrait animation. Learn what the tool does well. Then add complexity – longer scripts, more dynamic motion, background music, multiple scenes. Mastery comes from iteration, not from nailing it on the first try.
Common Issues and How to Fix Them
| Problem | Likely Cause | Fix |
| Face looks distorted | Photo angle too extreme | Use a front-facing or near-front-facing photo |
| Mouth movements don’t match audio | Noisy audio track or accent the AI struggles with | Re-record in a quiet space, speak more slowly and clearly |
| Motion feels jerky | Too much animation intensity | Reduce the motion depth or switch to a gentler preset |
| Background warps around the subject | Complex background with no clear separation | Choose a photo with a simpler background or use the masking tool to define the subject area |
| Output is low resolution | Source photo was small or tool exported at low quality | Use a higher resolution source photo and check export settings |
What You Can Create Right Now
If you are reading this and want to produce something today, here are three starter projects that take under 30 minutes each:
Project 1 – Social media intro: Take a clean portrait photo, write a 15-second script introducing yourself or your brand, run it through a lip sync tool, add captions, and post it as your new profile introduction video.
Project 2 – Product highlight: Take your best product photo, apply cinematic motion with a slow zoom toward the most important feature, add a text overlay with the product name and key benefit, and publish as a feed post or story.
Project 3 – Memory reel: Gather five personal photos – a trip, a celebration, a milestone – animate each one with gentle motion, stitch them together with a simple transition and a music track, and share as a short video with friends or family.
Each of these projects starts with nothing more than photos you already have and ends with a polished video that looks like it required far more effort than it actually did. That is the power of this workflow: it converts the photos sitting idle on your phone into fresh content people actually want to watch.